Sentry
Reach out to your customer success manager or support and we’ll enable in your account.
Overview
Sentry allows you to easily centralize all your exception and error tracking across your stack. By tracking exceptions via Sentry's API and libraries, you can leverage their grouping algorithms to review exceptions that are similar to each other in one place. They offer support for most platforms, including JavaScript, Node.js, PHP, .Net, Go, Python, and more.
Use this integration to send exceptions from your Projects in Sentry to Harness FME. When configured, Harness FME will quickly process and display Sentry exception data in Harness FME as track events for analysis. You can control what environments and traffic types you're capturing exceptions for in Harness FME without having to touch any code.
Setting up the integration
Integration Requirements
In order to use this integration, you will need to:
- Be on Sentry's Business plan or above.
- Send Environment data as part of your Sentry implementation. This is necessary in order to map your exceptions to the proper Harness FME environment
- Send key data as part of your Sentry implementation. This is necessary in order to map your exceptions to the proper FME traffic type and to set the proper
keyfor track events in Harness FME.
In Sentry
For each Sentry project that you want to integrate with Harness FME, you will need copy and paste three things into Harness FME:
-
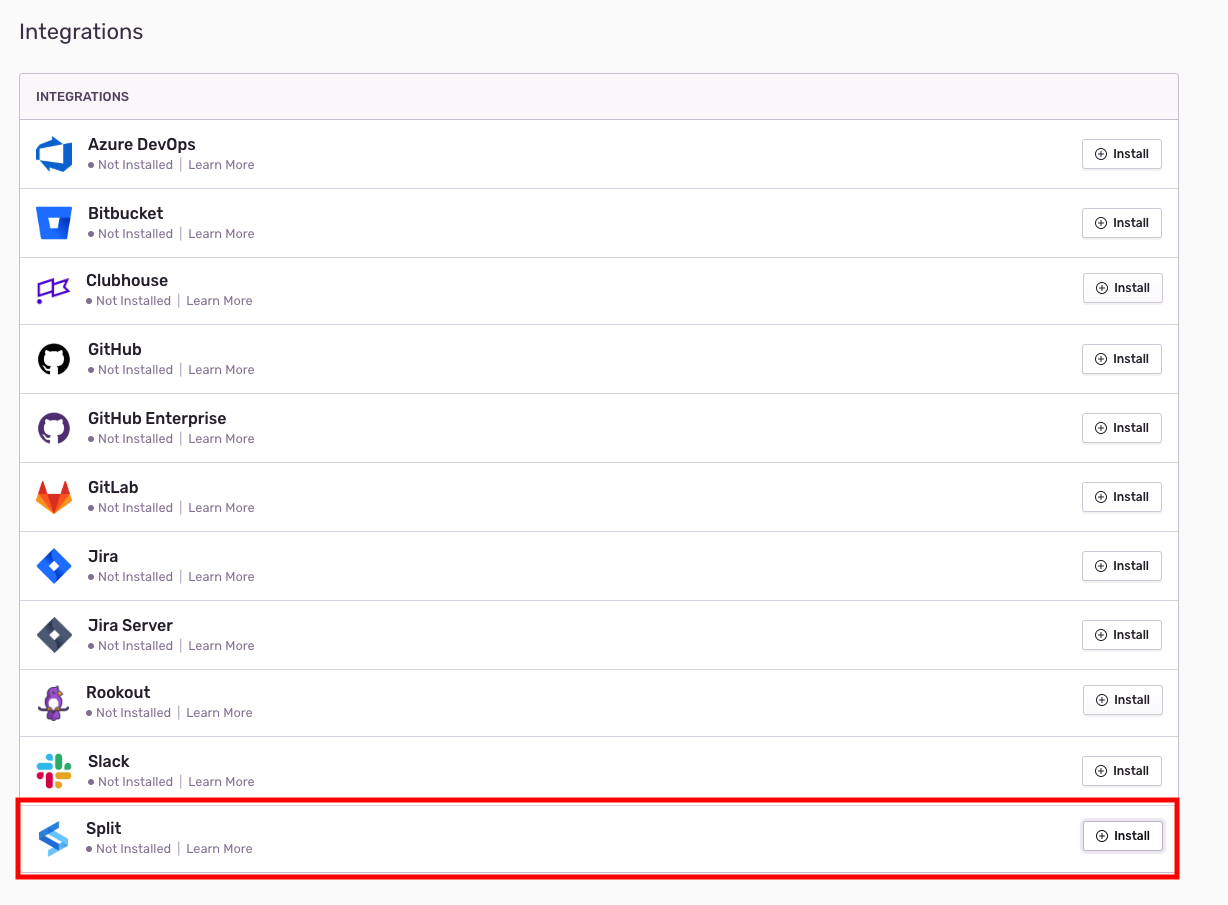
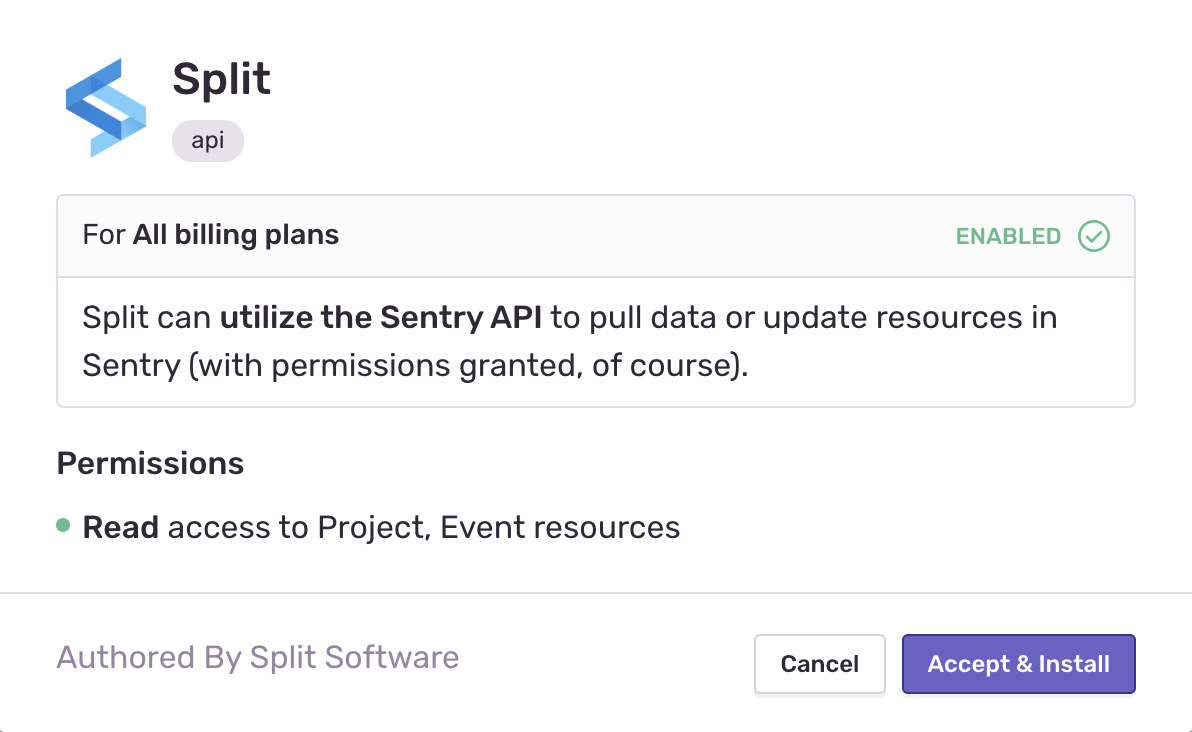
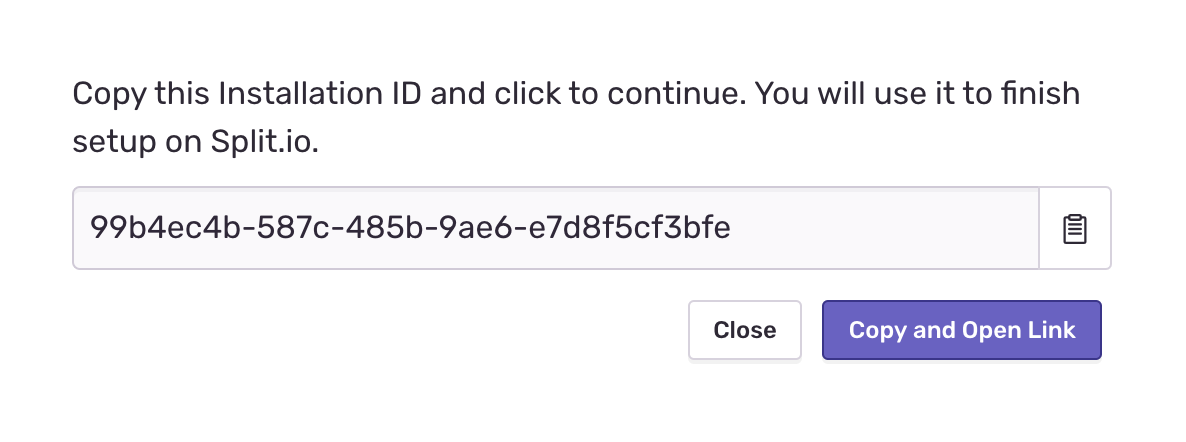
Install the Harness FME Integration by navigating to Organization Settings > Integrations and clicking "Install" on that page. Accept and Install the integration and make sure to copy down the Installation ID that then gets shown.
Select the Split Integration:
Accept the Installation:
Copy the Installation ID to paste into Harness FME:
-
Copy your Sentry Organization Name. You can access this by clicking Settings in the left nav of your Sentry dashboard then clicking General Settings under the Organization section.

-
Copy your Sentry Project Slug. You can access this by clicking Settings in the left nav of your Sentry dashboard, then click Projects under the Organization section. Select your desired project from the list there and you can then grab the Project Slug from the General Settings section.

In Harness FME
-
Click the profile button at the bottom of the left navigation pane and click Admin settings.
-
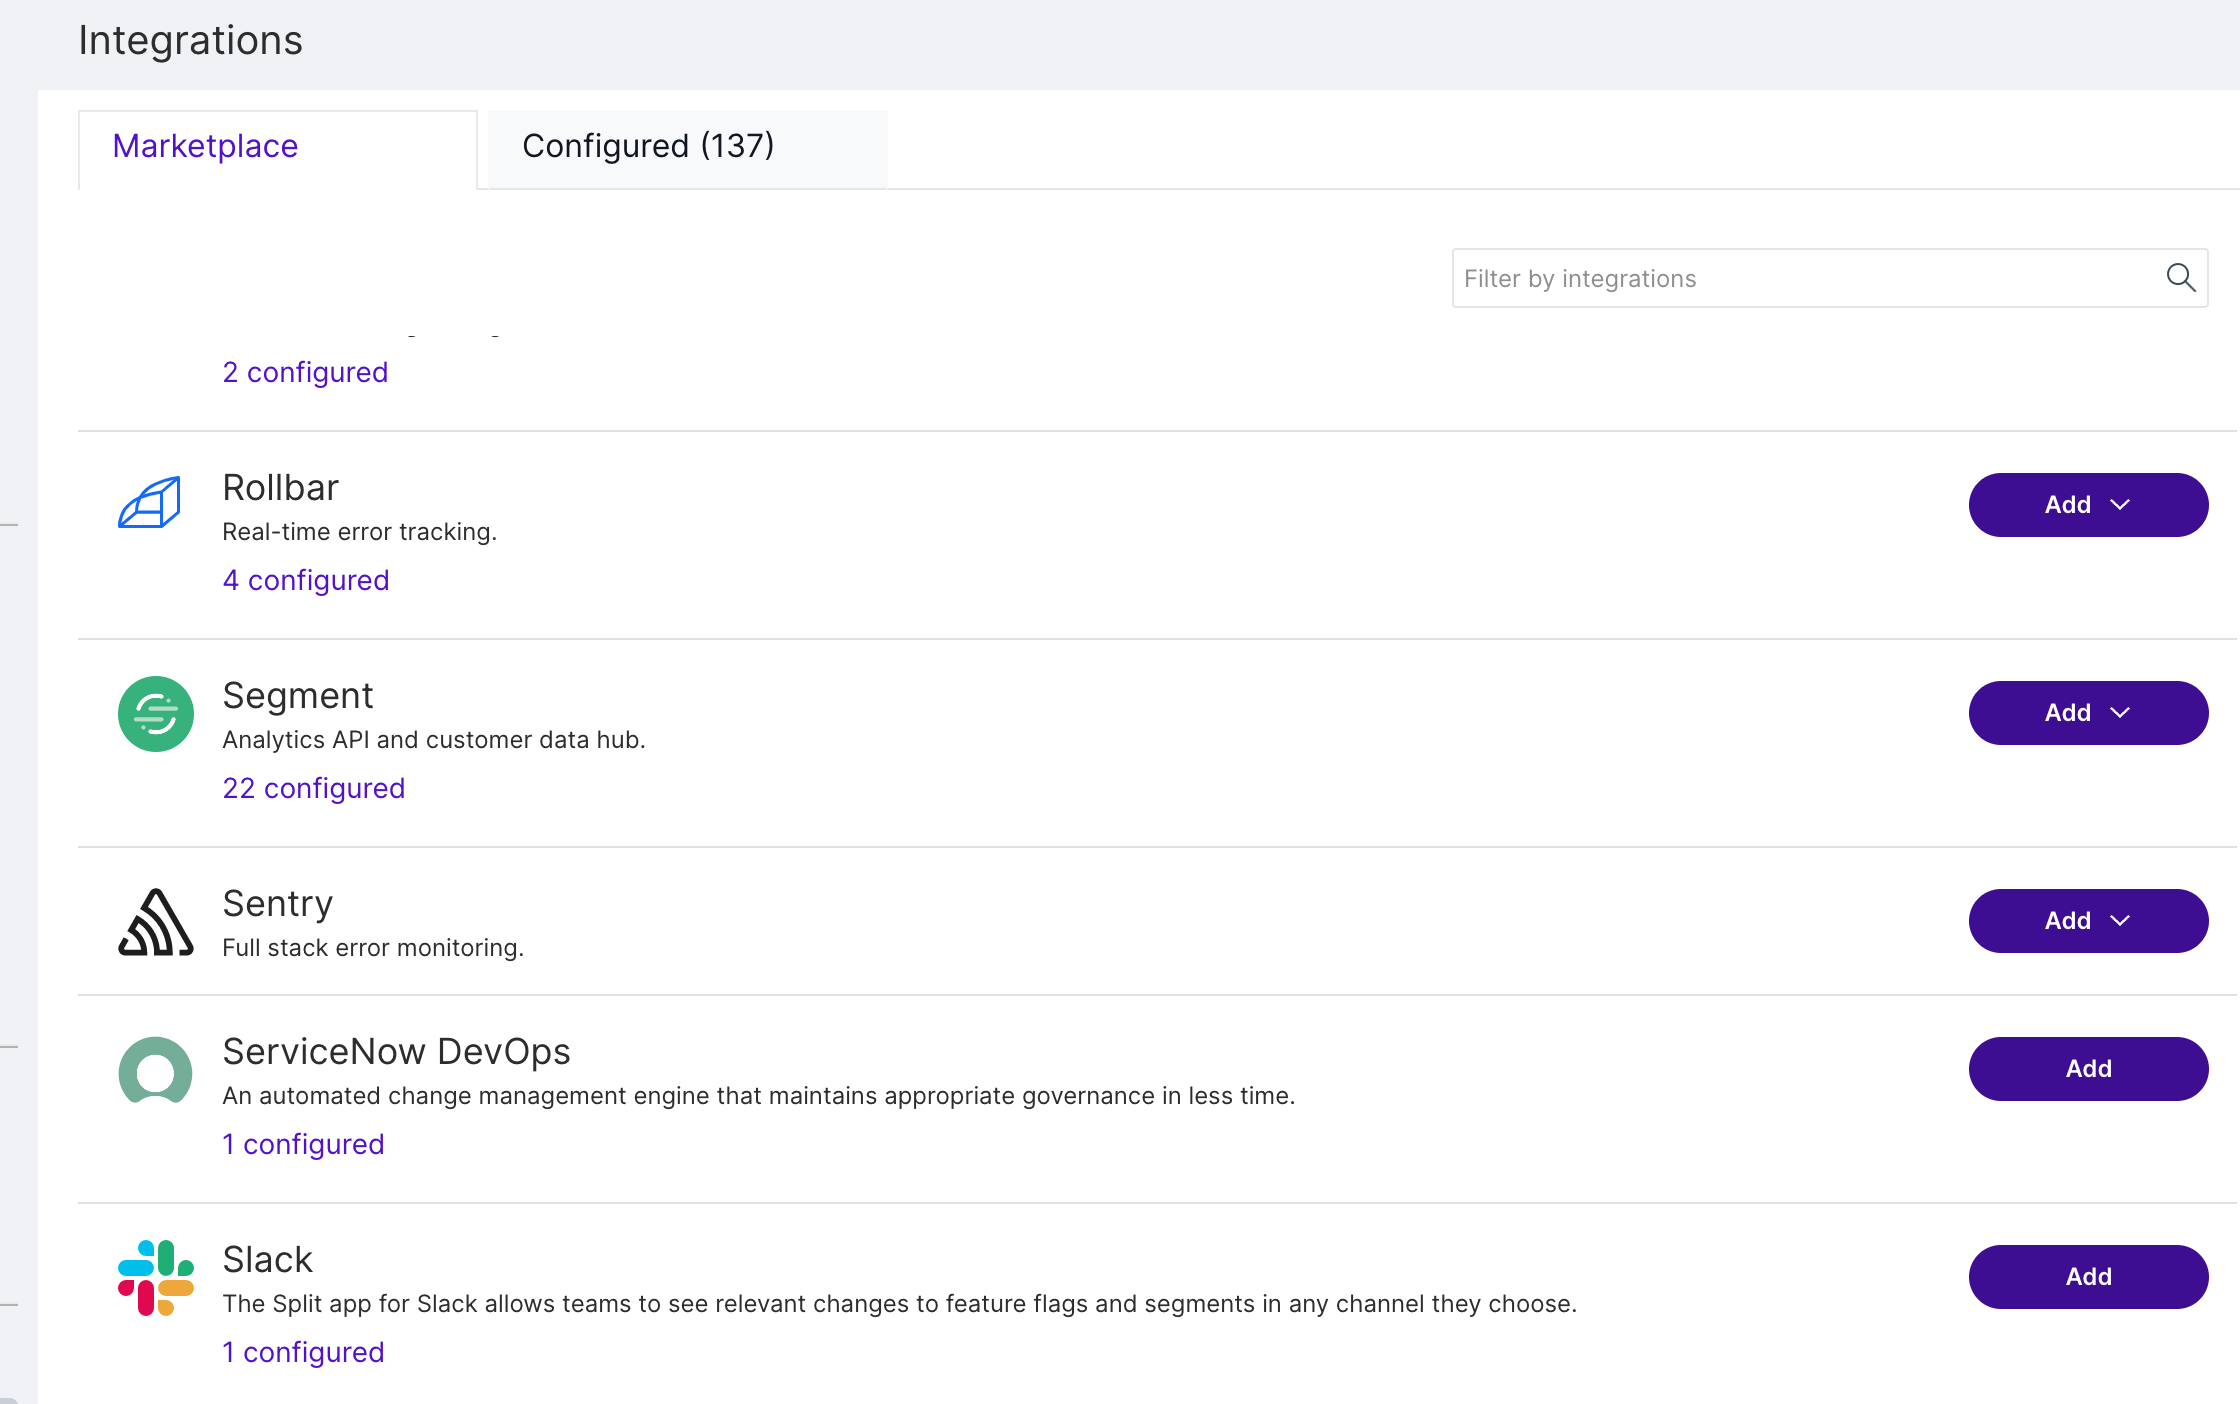
Click Integrations and navigate to the Marketplace tab.
-
Find Sentry in the integration list, click Add and select the project for which you would like to configure the integration.
-
Configure the Sentry integration as follows:
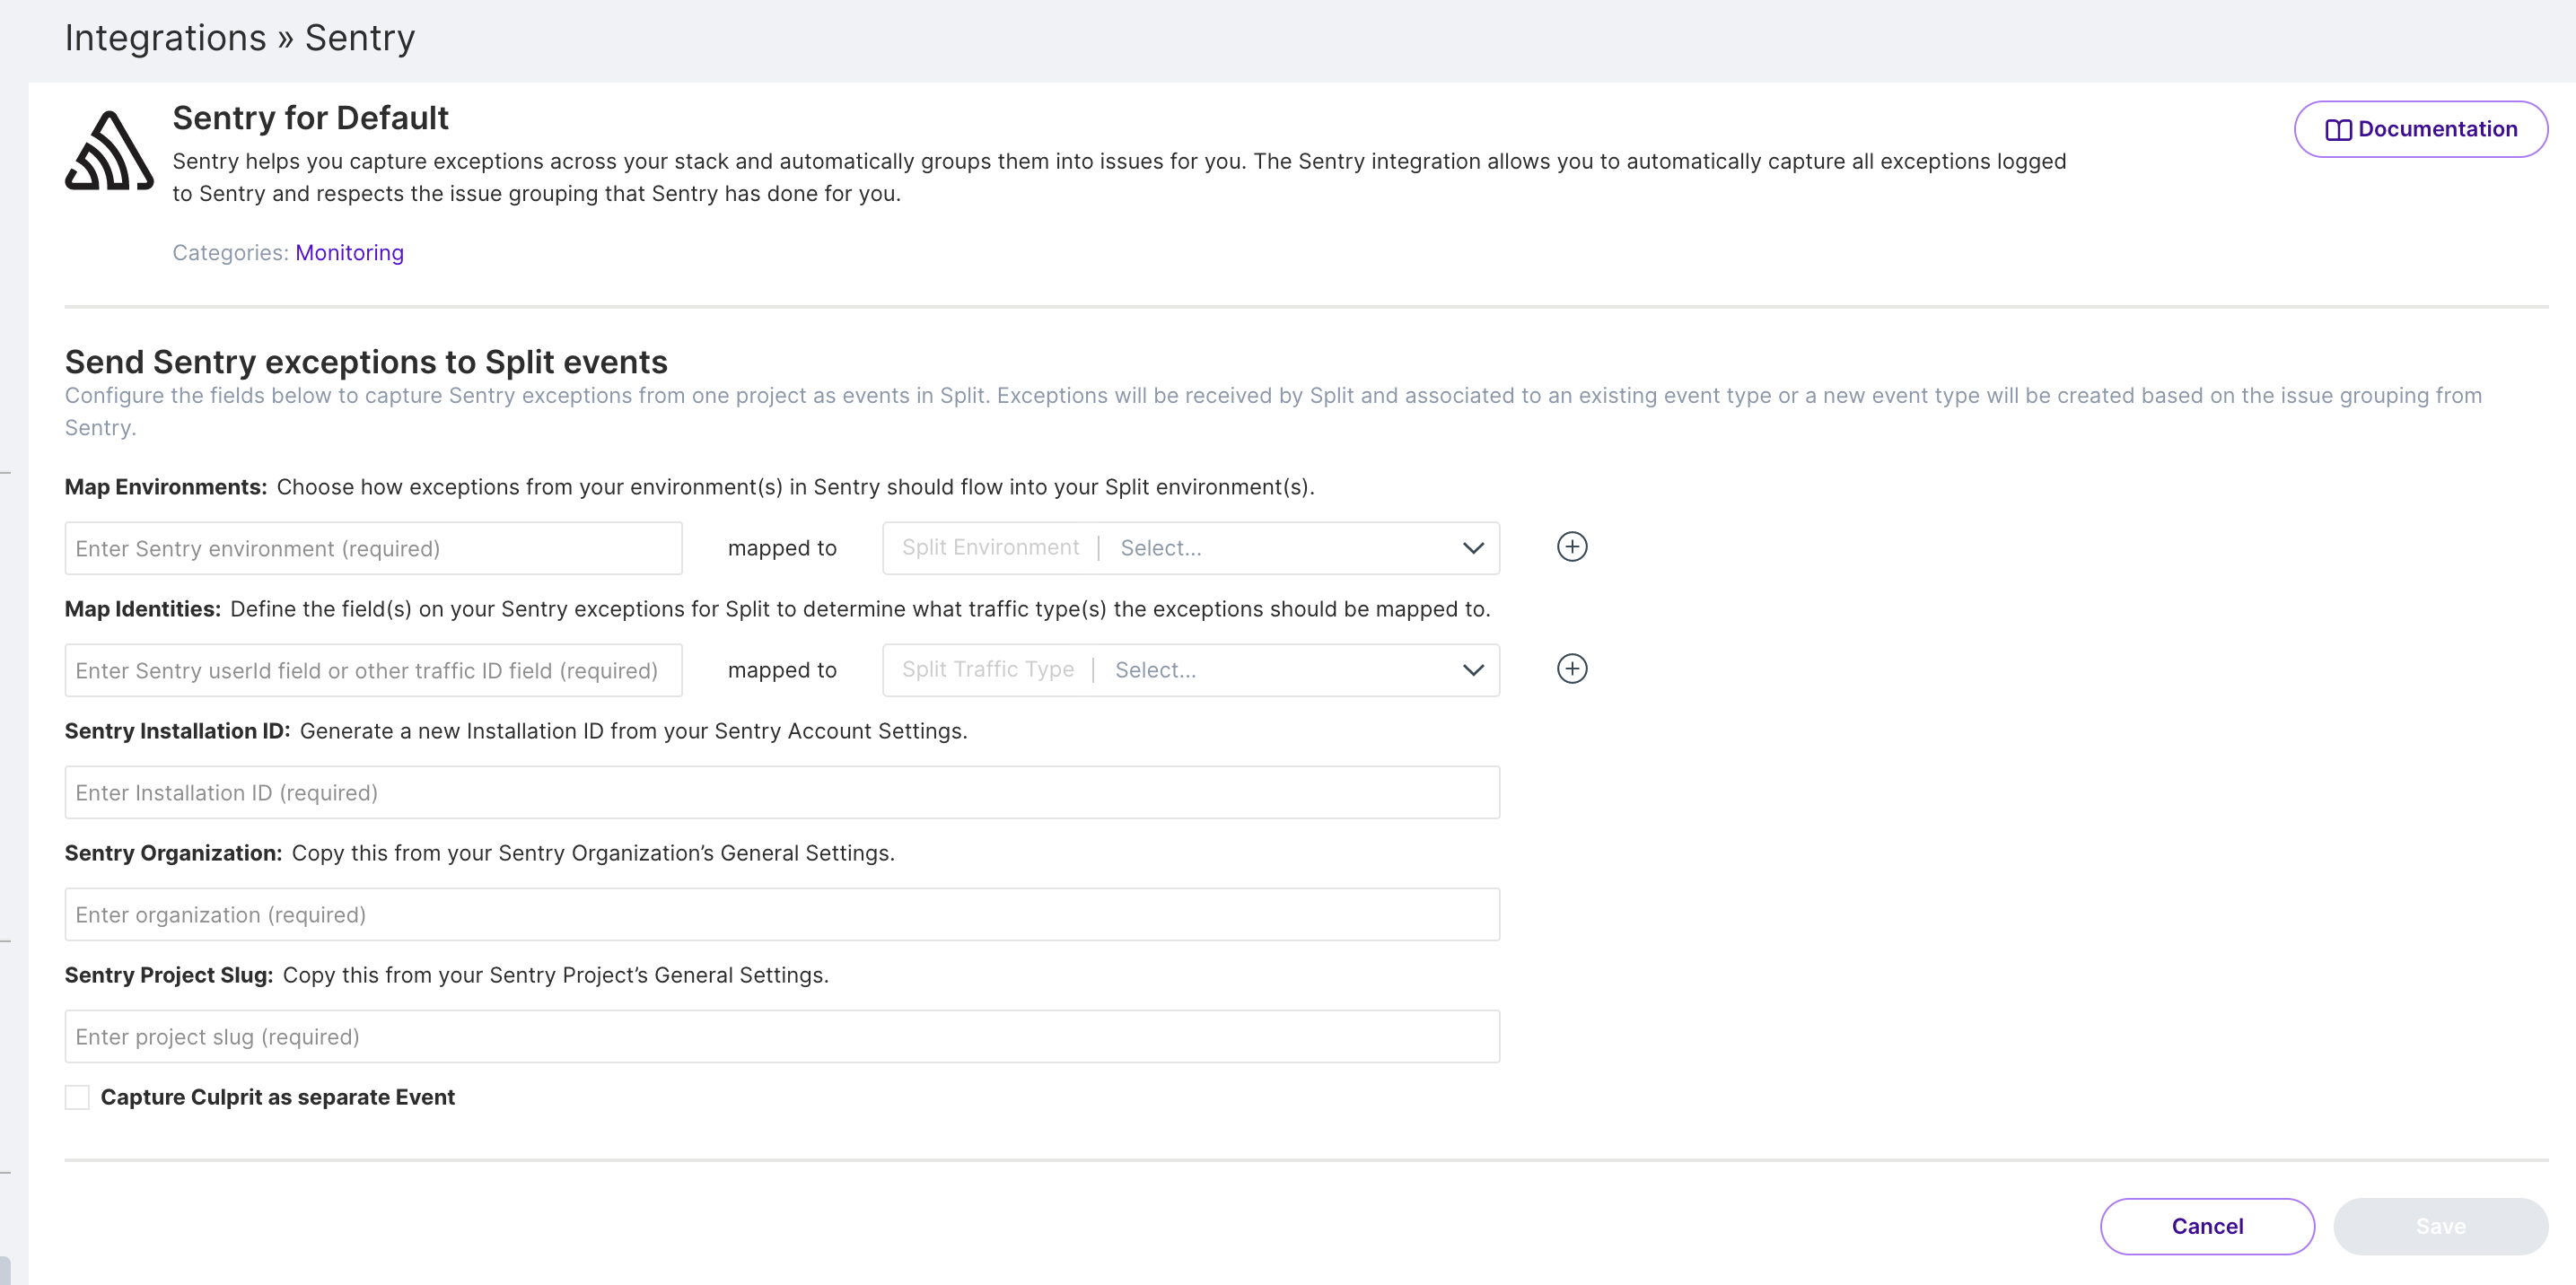
-
Map Environments. Select how exceptions from your environment(s) in Sentry should flow into your Harness FME environment(s). You can create a mapping for each environment you have in the Harness project you're configuring this integration for. Use the '+' and '-' buttons to configure as many mappings as you want.
The left side of the mappings are text fields where you should enter the exact names of your environments as you use them in your Sentry implementation when you log it in your code.
For example, assume you have the following Sentry configuration within your application:
import * as Sentry from '@sentry/browser';
Sentry.init({
  environment: 'staging',
})
Since the
environmentproperty is set to "staging", you would type "staging" into Harness FMEThe right side of the mapping(s) are menu lists of all the environments in your project in Harness FME. Select the FME environment(s) that you want to map to each Sentry environment.
-
Map Identities. Determine how exceptions from your Project in Sentry should be mapped to different FME traffic types. You can create a mapping for each traffic type you have in the Harness project you're configuring this integration for. Use the '+' and '-' buttons to configure as many mappings as you want.
The left side of the mapping(s) are text fields where you should enter in the exact key and path in your Sentry exceptions for your keys as you use them in your Sentry implementation when you log it in your code. For example, if you had used the exact syntax shown in the linked Sentry article in your code, you would want to type "data.erroruser.id" into this field in Harness FME. For more context, take a look through the example data mappings below as well as Sentry's example webhook errors here.
The right side of the mapping(s) are drop down fields of all the traffic types in your project in Harness FME. Select the FME traffic type(s) that you want to map to each Sentry identity.
-
Sentry Installation ID. Paste the Installation ID here that you copied from above in Sentry's pop up modal.
-
Sentry Organization. Paste the Organization name here that you copied from above in Sentry.
-
Sentry Project Slug. Paste the Project Slug here that you copied from above in Sentry.
-
-
Capture Culprit as separate Event. If you have have specific Sentry Issues that come up consistently and want to be able to create metrics based on a specifc Sentry Issue - select this checkbox to capture an extra event for each exception sent from Sentry.
Once you've configured the above fields, click Save. Harness FME will then create a Service Hook for you on your Sentry project. At this point, your integration is now configured. Exceptions should start flowing in as track events and you will be able to define metrics as you need!
-
Example data mappings
Below are some examples of how you might set up the integration depending on your Sentry implementation. For full examples of how Sentry formats data from their webhooks check out their docs here.
Standard data mapping
Let's walk through what a Sentry integration setup might look like if you're using a Sentry JS project and are capturing exceptions from both a 'staging' and 'production' environment in that project.
1. Sentry Exception Logs
Below are two example exceptions that you might log via the Sentry JS SDK.
Sample Exception in staging:
import * as Sentry from '@Sentry/browser';

Sentry.init({
  environment: 'staging',
  dsn: 'YOUR_DSN'
});
Sentry.configureScope((scope) => {
  scope.setUser({
    id: 42,
    email: "john.doe@example.com"
  });
});
const x = Error('Test error');
Sentry.captureException(x);
Sample Exception in production:
import * as Sentry from '@Sentry/browser';

Sentry.init({
  environment: 'production',
  dsn: 'YOUR_DSN'
});
Sentry.configureScope((scope) => {
  scope.setUser({
    id: 42,
    email: "john.doe@example.com"
  });
});
const x = Error('Test error');
Sentry.captureException(x);
2. Harness FME Sentry Integration
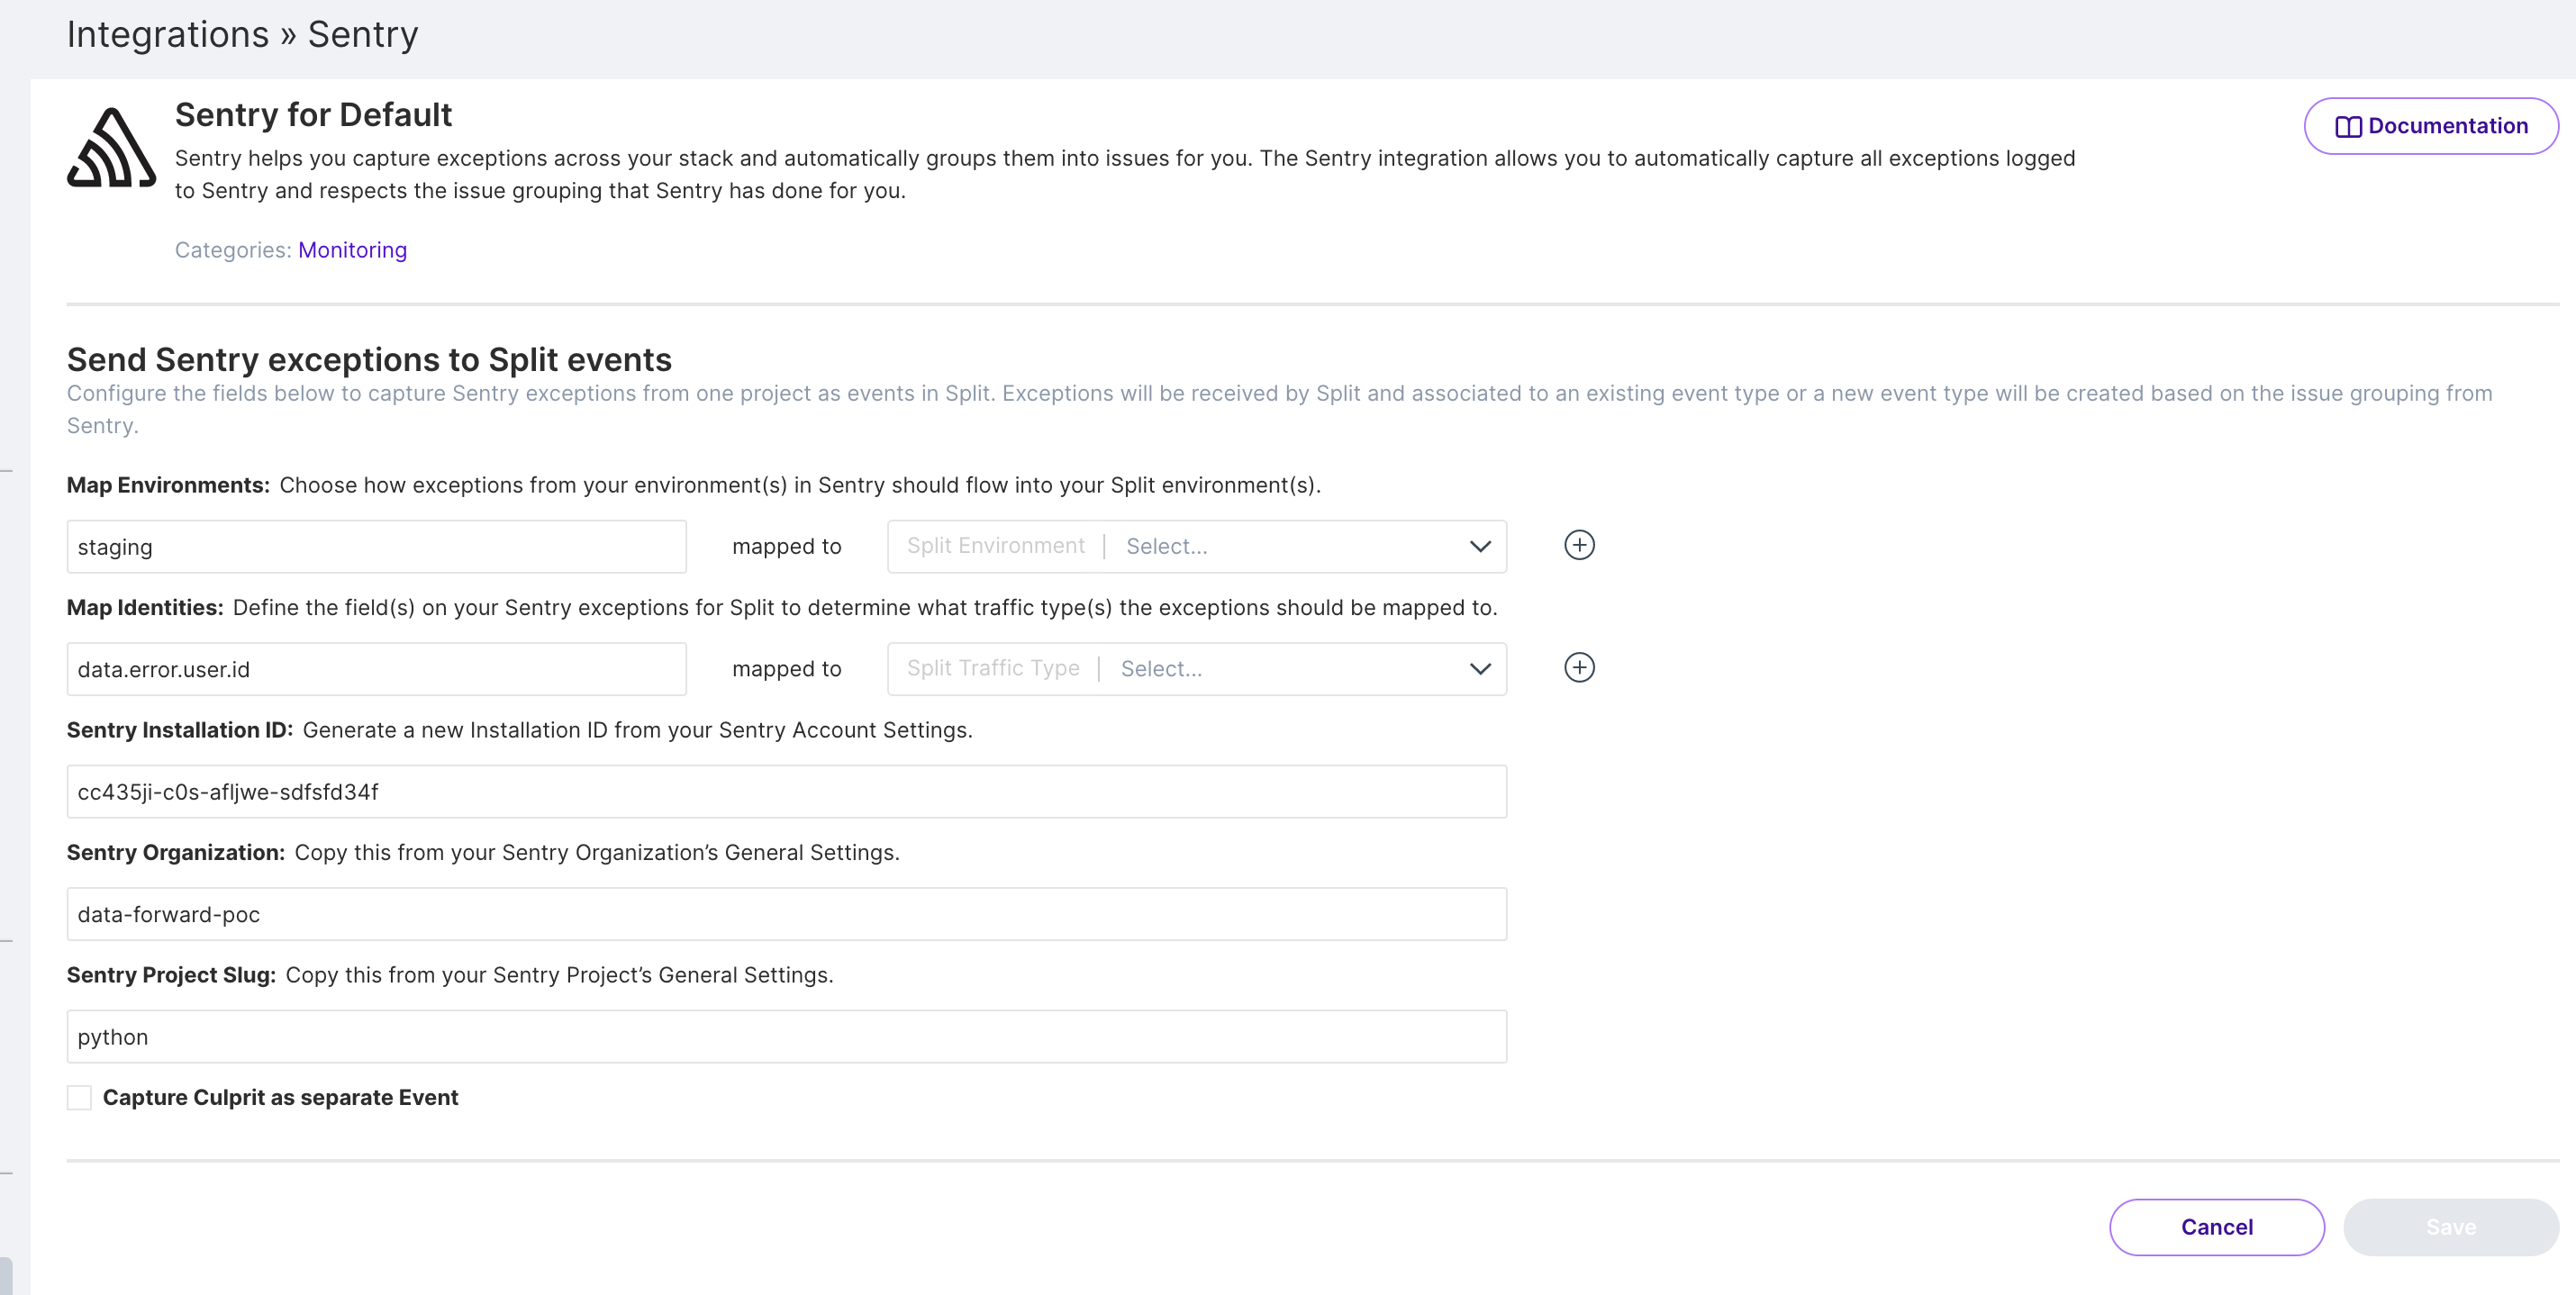
Below is a screenshot of how you could then configure your integration in Harness FME.
3. FME Track Events
Below is a JSON representation of the events that would then be logged in Harness FME from the sample exception examples above.
Sample Track event in staging:
{
  ...
  "eventTypeId": "sentry_exception",
  ...
  "environmentName": "Staging",
  "trafficTypeName": "user",
  "key":"42",
  "timestamp": 1561499129336,
  ...
  "source": "Sentry",
  ...
}
Sample Track event in production:
{
  ...
  "eventTypeId": "sentry_exception",
  ...
  "environmentName": "Production",
  "trafficTypeName": "user",
  "key": "42",
  "timestamp": 1561499129336,
  ...
  "source": "Sentry",
  ...
}
Multiple traffic type data mapping
Let's walk through what a Sentry integration setup might look like if you're using a Sentry JS project and are capturing exceptions from a 'production' environment in that Sentry project. Additionally, lets assume that you build B2B software and you identify both an orgId and userId on all your exceptions so that you know what user's trigger an exception and what organization that user was part of.
1. Sentry Exception Logs
Below is an example exception that you might log via the Sentry JS SDK.
import * as Sentry from '@Sentry/browser';

Sentry.init({
  environment: 'production',
  dsn: 'YOUR_DSN'
});
Sentry.configureScope((scope) => {
  scope.setUser({
    id: 42,
    email: "john.doe@example.com"
    orgId: 55
  });
});
const x = Error('Test error');
Sentry.captureException(x);
2. Harness FME Sentry Integration Setup
Below is a screenshot of how you could then configure your integration in Harness FME.
3. FME Track Events
Since you have multiple traffic types mapped, we will create one track event in FME for each mapping you've set. The events will be very similar except the trafficTypeName and key will be different based off of your mappings. Below is a JSON representation of the events that would then be logged in Harness FME from the sample exception example above.
Sample Track event for your user traffic type:
{
  "eventTypeId": "sentry_exception",
  ...
  "environmentName": "Production",
  "trafficTypeName": "user",
  "timestamp": 1561499129336,
  "key":"42",
  ...
  "source": "Sentry",
  ...
}
Sample Track event for your org traffic type:
{
  "eventTypeId": "sentry_exception",
  ...
  "environmentName": "Production",
  "trafficTypeId": "98765",
  "trafficTypeName": "org",
  "key": "55",
  "timestamp": 1561499129336,
  ...
  "source": "Sentry",
  ...
}